In my last post I talked about approaching a stranger and in this post I share some of my thoughts on what makes a good street portrait. No matter what direction you want to take your project, I found that the key factors are the person, light and location.
IT’S ALL ABOUT THE PERSON
The question I get asked most by friends is how I choose my strangers. The answer is varied but usually there will be something about them or what they are doing that instantly draws me to them. When I dig deeper there have been so many reasons as to why I have chosen that person. Here are my main reasons
- The stranger is full of character
- He/she is stylish and fashionable
- They look like they have a story to tell
- They are gorgeous (yes Matt, I admit it) either in looks or personality
- It’s the perfect person for the location

Stranger 81 - Yasmin (I think she ticked all the boxes mentioned above)
LET THERE BE LIGHT
Harry’s pal: “Don’t look at the light”
Harry: “I can’t help it! It’s so beautiful”
(A Bug’s Life)
After choosing the stranger I think this is the most critical factor in getting a strong picture. Light has a myriad of personalities that can influence the mood of a portrait. It is such a humungous topic that for this post I will just talk about avoiding crappy light (yes, that’s a technical term) and some ways to create flattering light.
Common lighting issues in street portraits
Eyes are the window to the soul and for that reason you want to avoid raccoon eyes. These are the shadows that are caused in the eyes especially when the sun is high during the middle of the day. If these shadows are really deep you may not even see the eyes.
In London, we have been known to occasionally see the odd clear blue sky and unrelenting sun. This almost always means a happier general public, train delays due to heat and red Brits due to sunburn. For us it can also mean squinting eyes which can just make your subject look uncomfortable.
Another classic problem can come from dappled light and typically occurs if you place your subject under a tree. This can cause uneven lighting on your strangers face and in most cases is unflattering.
The Golden Hour
The best light is during the golden hour which is either the hour after sunrise or the hour before sunset. This gives a beautiful soft golden light that is low enough to illuminate the face and especially the eyes.

Stranger 79/100 - Santi (taken around golden hour time)
But what about the rest of the time? There are 24 hours in the day and maybe you can’t go out during those golden hours. Never fear, there are plenty of ways to harness the light.
Open shade
Often the best option is just to seek the shade or more specifically open shade. Open shade is that sweet spot in the shade where your subject is still illuminated by the light but not so much as to cause the problem of racoon eyes and squinting as mentioned above.
Overhangs from buildings can be a fantastic form of open shade since it channels the light and gives it a direction that you can play with. In this portrait of Ed I saw how the canopies from the shops were shaping the light onto his face.

Stranger 80 - Ed (using open shade)
Alleyways
Alleyways are fantastic for lighting street portraits as they create a direction and softness of light that can be hard to beat. They usually have the advantage of being in the shade as mentioned above and can sometimes also give you two light sources, one from the front and one from the back. This helps to take your portrait up a notch, and we all like that.
In Emile’s portrait, I was able to get both light on his face and a rim light around him since light was coming from both ends of the alleyway. The walls on either side also created shadows on either side adding depth and dimension to his face.

Stranger 93 - Emile (shot in an alleyway in Soho)
Use the environment to your advantage
If you shoot in the city, you can use walls to your advantage. Light coloured walls can become natural reflectors to bounce light back into a person’s eyes or you can use darker walls to create shadows for dimension and depth. If you look around you there could be other things in your environment that you can use to modify and shape the light, for example, a white van could also be used as a makeshift reflector.
This portrait of Ricky in Soho was a classic example of using the various walls in this narrow alleyway to my advantage. The light coloured wall behind me reflected light onto his face while the dark walls on the side created the shadow to give his face shape and depth. The light coming from behind helped to add some light to his hair too. I also added a reflector to give his eyes some extra light and to make the image pop.
Stranger 99 - Ricky (using walls the shape the light)
Enhance the light
As I mentioned in my post on getting started, I would highly recommend you invest in is a reflector. This has saved my you know what on so many occasions. Ricky’s portrait above show’s how, even with existing good light, you can enhance it and add some nice catchlights to the eyes.
Backlight
One fail safe option is to backlight the person, i.e have them facing away from the light. Not only do you get even light on the face but you can also make the hair pop from the light hitting it.

Stranger 57 - Nicola (using Backlight)
LOCATION, LOCATION, LOCATION
I used to give more importance to location over lighting. Now, I would say light is more important, but location is close behind. The background must either add to the story or not be distracting. So what options do you have?
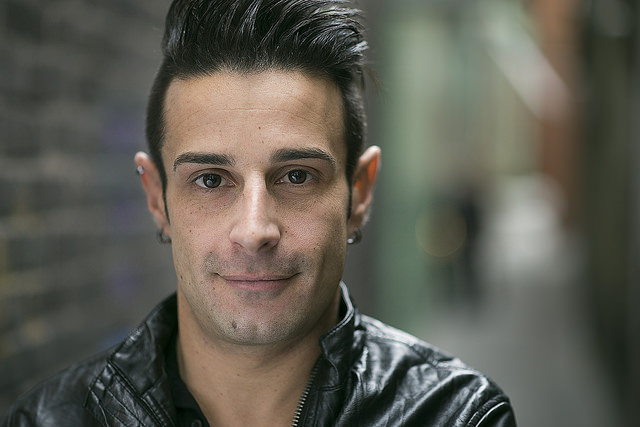
Bokeh the hell out of it: By blurring the background out, using a very shallow depth of field. Not only can you get rid of distractions, but it also gives a painterly depth to the image.

Stranger 90 - John
Clean backgrounds: Plain backgrounds are always a great option since there is almost always a plain wall which you can utilise to showcase your subject. You can then also use graphical design tools like complimentary colours to make your subject pop.

Stranger 69 - Jordon
Cool Backgrounds: Sometimes the background is just cool. I had earmarked this spiral background for a long time but it took me a long time to find a stranger who would not be overpowered by it. When I saw Camilla I knew that the striking background would draw you to her

Stranger 78 - Camilla
Seeing the Scene: One of the aspects of stranger portraits I would like to get better out in my second round is to include the environment more. This can give more visual interest to a portrait. In this portrait of David, I saw the strong graphical shapes being created by the stairs and gates as well as the symmetry of the bike.

Stranger 41 - David
So there you have it, a few pointers that help me get a good stranger portrait. I hope these are useful to you and please share any other factors which you think are important in making good stranger portraits